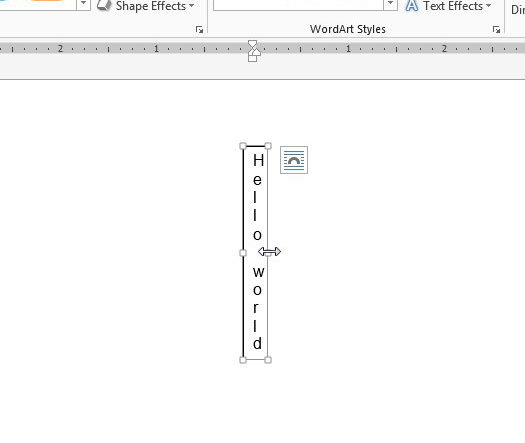
While normal text that is inserted into your document can not be written vertically, you can write vertically in Word 2013 with the assistance of a text box. A text box in Microsoft Word exists on a level above the actual document and can be manipulated separately from the main document body. So continue below to see two ways that you can write vertically in Word by taking advantage of text boxes.
How to Type Vertically in Word
Our guide continues below with additional information on writing vertically in Microsoft Word, including pictures of these steps.
How to Make Vertical Text in Word 2013 (Guide with Pictures)
The steps in this guide will show you how to write vertically in Word. This guide was written specifically for the Word 2013 version of the program, but the same concept will work in other versions as well.
Step 1: Open your document in Word 2013.
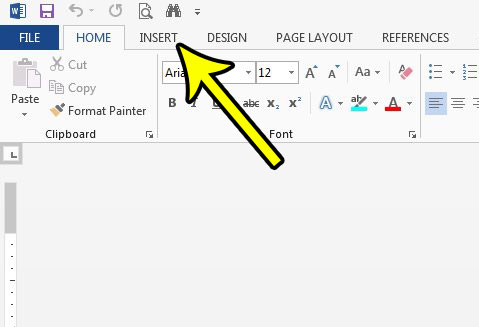
Step 2: Click the Insert tab at the top of the window.
If the vertical text is going in a specific location of an existing document then you might want to click at that spot in the document before continuing with these steps.
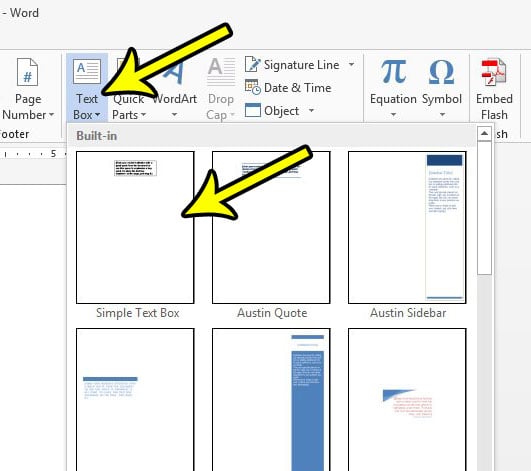
Step 3: Click the Text Box button in the Text section of the ribbon, then click the Simple Text Box option.
You can use one of the other text box options, however, if you would prefer.
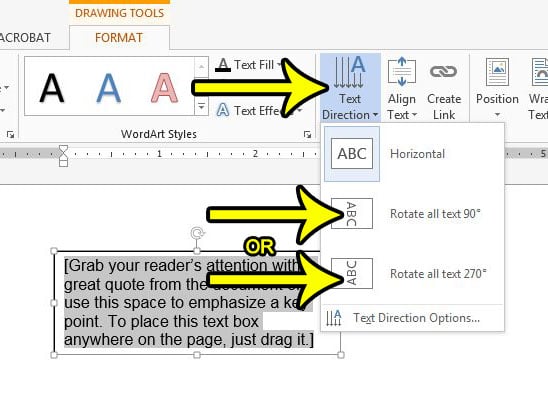
Step 4: Click the Text Direction button in the Text section of the ribbon, then click the Rotate all text 90 or Rotate all text 270 option, depending upon the direction that you would like your vertical text to go.
The Rotate all text 90 option has your text going from the top of the text box to the bottom, while the Rotate all text 270 option has the text going from the bottom of the text box to the top. If this isn’t creating the desired result, or if you would prefer to use another option, then the next section shows an additional way to type vertically in Word.
Alternate Method – How to Rotate Text in Word 2013
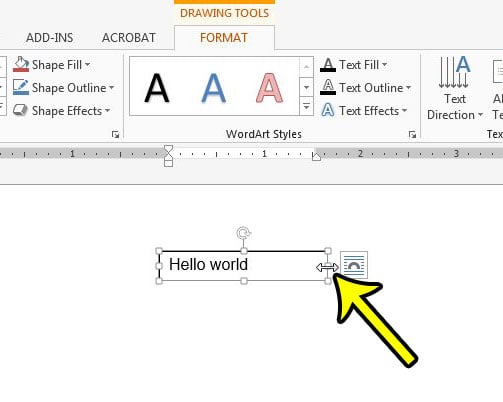
If you want to write vertically in Word 2013 without rotating your text, however, then you will need to use a very thin text box that you manually resize. Once a text box gets thin enough, the letters in your text will be forced onto separate lines. You can do this by typing your text into a normal text box, then clicking and dragging the right border of the text box to the left. Once you make the text box thin enough, the text will start splitting into additional rows, with one letter on each row. This can look pretty odd depending on what you are typing and which font options you have chosen, so you may need to select all of the text in the text box and adjust various formatting options to make it look better. Does your document need to be single-spaced, but you are having difficulty getting that setting to work properly? Find out how to single space in Word 2013 by changing some style settings that you can even set as default options.
Why Would I Want to Write Vertically in Microsoft Word?
Many users that create a Word document will do so infrequently for school assignments, or for something at work. For many of these users Microsoft Word is thought of more as a text editor than anything else. But there are a ton of Format options on the Format tab of the application, and you can add a number of useful objects from the Insert tab where we showed how to insert a text box. For example, you might want to adjust the text alignment of a sentence or phrase and make it appear at the center of the page, such as when you create a title page. The Layout tab, or Page Layout tab, also lets you dramatically change the appearance of your document and the positioning of the objects within that document. All of these different tabs have assorted ways to change your text or add a shape or item to the document, and even more options can be found among the dialog box menus that appear when you click the small buttons at the bottom-right corner or many of the sections of these ribbon tabs. This combination of menu options and tools generates an impressive assortment of ways to create more visual documents like newsletters or flyers. Microsoft Word is quite advanced as you start exploring its features and can be used in many more ways than it might initially seem possible.
More Information on How to Write Vertically in Word
Before you elect to use vertical text in your Word doc, it’s best to make sure that you are creating this document for a school or organization that has strict formatting restrictions. Most of those formatting restrictions will not allow things like vertical text, so it’s best to ensure that its usage is approved before changing content in the document. In the tutorial above I recommend selecting the “Simple Text Box” option, but this is more a habit of mine than something that is required. You can choose from most of the other text box options and achieve the desired result. If you don’t want to enter your text vertically, but instead want it to be at an angle, or you want to write diagonally, then you can select the Rotate option in the Arrange section of the ribbon. You will find some default rotation options there, as well as a “More Rotation Options” item that allows you to choose the specific angle of the rotation, which allows for custom rotation options like 45 degrees and other non-90 degree options. If you choose the “Text Direction” option to write vertically then you will see the text immediately in the desired orientation. If you choose the “Rotate” method for writing vertical text then you will need to click out of the text box before you can see what it will look like on your document page.
Additional Reading
He specializes in writing content about iPhones, Android devices, Microsoft Office, and many other popular applications and devices. Read his full bio here.
